Showing posts with label West Philly Tool Library. Show all posts

Sunday, January 8, 2017

Vacation Week

I took an extra week off to ostensibly "get so much done". 
Well....
While I did a lot - I didn't actually get much done. I chipped away at my list and got to about half of things I wanted to get to. 
 
First was making a huge dent in getting these mittens finished. I've been wanting to make them for more than two years. But with projects for other people and other things needing to be finished first - they had to wait. I started one before heading to California but didn't finish it until I got back here. I had to knit the top several times. And then the cuff was knitted afterward and I didn't have the pink yarn with me. I thought I 'd wanted an orange yarn I had - but it wasn't right. This took some serious doing to get the color variation the way I wanted it. In the end, it was worth all the extra effort and re-dos.  The second mitten is going much smoother but is still quite a project. I'm working on the cuff now and hope to finish them this week. Can't wait to wear them!

The second priority was to make sure the Silhouette cutter was working and it is!!!
I've cut a few things out and am excited to plan some new projects. In case you aren't familiar with these, they are just like printers, except that instead of printing on the paper, it cuts out shapes you have set up in the software that comes with the machine. You can cut paper, vinyl, stickers, and ??? I'm looking forward to finding out.  

I did get to one of the essential projects on my list: fixing the love seat! Remember this crazy project?
Well, I didn't put enough webbing on the bottom and pretty quickly it all popped off. The sofa was really saggy and becoming quite uncomfortable to sit in.
You can see in the above image how much the black part is sagging or popping out.
Last time, I did the whole thing by hand, from pulling out all the old nails and staples, to putting it all back on with a regular old staple gun. This time I got smart. I went to the trusty West Philly Tool Library and checked out an air compressor and staple gun. 
Holy Moly did that make a difference! You just squeeze the trigger and BAMphfft. Staple in. The only thing is the noise. The generator is loud loud loud! But some little ear plugs help.

I wasn't taking any chances this time, the base is plastered completely with webbing. And it's not coming off this either. Ever. Right now I am thrilled. Talk to me when I try to reupholster this sucker again. Then I won't be so happy.
But for the moment the base is flat like it should be and it feels much more comfy.  

Today was Stitch & Bitch our monthly knitting and political discussion group. I really look forward to it. We always bring something to eat and it has sort of become my job to bring the sweetie. Well fine by me. I tried one of the "Cocoanut Pudding" recipes in Ellen Emlen's cookbook. It's really more like a giant macaroon in a pie crust than a pudding but maybe I'm doing something wrong. Tasted just fine though.
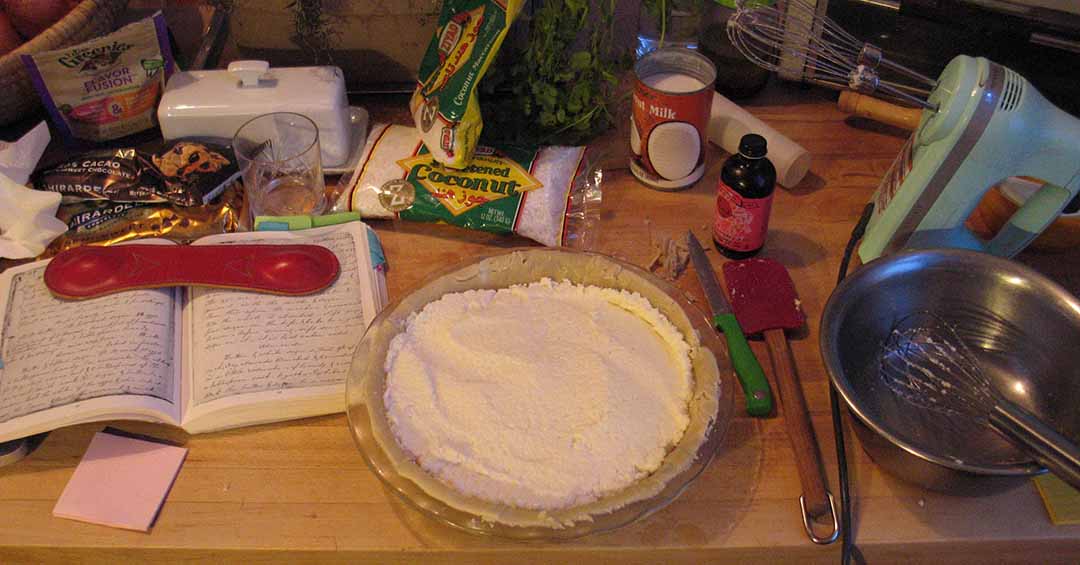


Cream 1 cup (two sticks) butter with 1 cup sugar. Add 2T cognac 1t. rosewater and 2T coconut milk beat smooth. 
beat 8 egg whites to a snow, (and here's where I think I went wrong) add 3 cups unsweetened coconut.
combine the two mixtures. I think I should have added the coconut to the butter mixture and then folded the egg snow into that mixture.
Put it into a pie crust and bake for 50 minutes at 350F. I had to tent it after 30 minutes. It's very tasty, but I think it needs something. 

I drizzled chocolate over it but that's not quite right. Maybe I need thicker chocolate, but I was also thinking something very light like a pineapple sorbet. Or maybe even just some lemon zest in the crust could do? Not sure. At any rate - definitely a recipe worth working on.

Thursday, March 31, 2016

Omi's Cabinet

So - this is a view of my kitchen rarely seen. The fridge is on the left. 
I inherited this cabinet from my grandmother, my Omi. There were twins, this one and another, although I think the other had two doors and no drawers. My sister has the twin. The top half should have sliding glass panels, which I believe I still have, but which are sort of a nuisance in a kitchen.
Somewhere in the move from Germany - to Southern California  - and then to Philadelphia, some things got lost. Shelves, primarily. 
Even in my recollection of this cabinet being in my "mother's room" (ie. the one we three slept in while visiting our grandparents) it had two more shelves than I posses now.
 The above mess has existed for almost 8 years, since I moved everything in. And I am tired of it. What a waste of space!
Part of my impetus to go to the West Philly Tool Library last weekend for the workshop was also to pick up a table saw in order to replace the shelves in Omi's cabinet.
Home Depot provided the sanded 2'x4'. And after cutting it to size (with the saw I checked out from the Tool Library), I decided to forgo to the traditional polyurethaning. Since I have so much decorated paper - I decided to simply cover the boards with decorative paper. The pink/purple paper I purchased at Artist & Craftsman, while the green is paste paper I made myself.
 Yay for organization!

Sunday, March 27, 2016

Easter Weekend

Happy Easter everyone! 
Sadly it was a very gloomy Easter Sunday here in Philadelphia. But, look there is a Johnny-Jump-Up in my garden! Thank you birds! (most likely). I don't think I've ever spread these seeds. If I did, they are far too old to bloom this year.  This little guy is more than welcome and I hope he spreads all over the place. 

Yesterday I took a Wooden Window Restoration Workshop at the West Philly Tool Library. I can not tell you how fortunate I feel to have this organization in my neighborhood. As some of you long time readers will remember, back in ought eleven, I started to strip the bay window on the first floor. Details can be found here: first post about stripping the windows.
Suffice to say there came a point where I was stuck. Like, really stuck.
 
 I'd been stripping all of the stuff, only to realize I also had to strip the wood of the sashes.  - Well how exactly do you do that!!!???
It didn't make sense to do it in situ because I couldn't get all of it anyway. So over the next 5 years, I would strip a little, think - I should take this apart - but what if I ruin it?-  and then give up.  Because deep down, I knew I had to take the entire window situation apart but I didn't know how. Not to mention that I figured it would be a ton of work.
Well, I was right on all accounts.
The first thing the instructor said was, Wooden windows were built to be fixed. Ha! Fantastic! Tell me how!
Within two hours, he had! 
I know how to strip the paint efficiently (with a heat gun).
I know how to cut glass. 
I know how to glaze the windows. 
I know how to use the putty and putty knife. 
And most importantly, I know what these things are for!
 Those are glazier's points. 
For some reason those fly around in my tool box. And I've had no idea why or what they are for (or even where they came from). Those things are pushed into the wood of the frame to keep the glass in place after the first layer of putty as been applied.
And finally, I understand how the weight works for the window. I'm supposed to be careful about the "coil" when I remove the sash.  
Otherwise, I'm supposed to just nail the chain in. It should be a surprise when I finally remove the actual sashes.  
So. 
The windows on the first floor are mostly original. The second and third floors have all been replaced. And now thanks to this workshop, after six years of stalling, I know how to proceed.
 I was hoping to show you some progress on my own project after taking this workshop, but alas, my morning bike ride proved what my 2am allergy fit already suspected, every single tree in Philadelphia that can bloom, has bloomed. I have allergy mush-for-brains. 
I spent the afternoon in the garden cleaning, which doesn't require too many brains. When fall comes, we pretty much abandon our gardens and allow nature to take its course. Here in the spring, we realize we heed to hop-to and clean things up before that's not exactly possible. Today I pulled some unproductive forsythias and generally raked debris from the winter. Yesterday I trimmed the front hedge. This coming week I have resolved I need to do a lot more general cleaning and some seed planting. 
Since most of this post is rather boring and non-picturesque, I'll leave you with Swee'pea's highlight of the week:
His new box du jour. He was thrilled mommy ordered something big enough for him to nestle in.